Be Unstoppable!


FOODIE FRIDAY! :-) I love foodie friday! Because...well I love food!

Sometimes you just get an inkling some Asian style good eats! But, as we all know, Asian style usually calls for lots of oil, lots of carbs, and generally not the healthiest thing in the world!

I don't know about you, but I never want to sacrifice my love of Asian food!

So...that's when tons of healthy substitutions and swaps come into play!

I have  recently discovered the amazing-ness that is cauliflower as rice! There's so many amazing cauliflower rice recipes - cilantro-lime, Cauliflower Rice Lettuce Wraps, and of course this new one...

Cauliflower Fried Rice! I found this recipe originally from The Recipe Critic!

As for the protein part of this week's MOTW (because I've gotta have me some protein in my life lol)...Asian Meatballs! This recipe I found on Get Fit with Nikki for Asian meatballs!

What do you need to buy?

For Cauliflower Fried Rice:

  • Head of cauliflower - $2.99
  • Mirepoix frozen vegetbale mix (Carrots, Celery, Onions) - $1.00
  • Eggs - $1.49
  • 2 bundles of Green Onions - $1.38
For Asian Meatballs:
  • 2lbs of ground turkey (I bought 4 because it was cheaper) - $8.99
Things I already had...
  • Sesame/Vegetable Oil
  • Soy Sauce
  • Powdered Ginger
  • Garlic Powder
Total budget (without counting the things I already had!) - $15.85

Directions:

For Cauliflower Rice:
  • Start with prepping the cauliflower rice
    • Cut up the cauliflower head into smaller florets
    • Place into a food processor
    • Process until the cauliflower achieves a rice-like texture and size
  • Now, the vegetables!
    • Empty the entire bag of frozen vegetables into a wok or large saucepan over medium to medium-high heat
    • Cook vegetables until softened
    • Beat 2 eggs lightly
    • Push vegetables to the side in sautee pan and add eggs
    • Scramble the eggs until fully cooked through
    • Once cooked, mix eggs and vegetables together
    • Add Cauliflower rice and soy sauce (to taste)
    • Sautee until rice begins to brown slightly

For Asian Meatballs:
  • SUPER EASY! 
    • Preheat oven to 375 degrees
    • Chop up one of the bundles of green onions
    • In a large bowl, use your hands to mix the green onions, garlic powder, powdered ginger and soy sauce into half (2 pounds) of the ground turkey
      • I'm not giving you specific amounts here because the amounts that you use will be fully dependent upon your taste and how much garlic, ginger, or soy flavor you want!
    • Once you've mixed all the ingredients in, start breaking the ground turkey into 24 meatballs...you may even be able to get 28 out of it depending upon how large you would like your meatballs to be!
    • Once you've rolled out your meatballs, place them on a greased baking sheet
    • Bake for 25 minutes

As for your 21 day fix portions...the rice is ALL veggies! So you can do as many green containers of cauliflower rice as you would like! For the meatballs, 5-6 of them should fit within your red container!  Therefore, each serving (depending on how many servings you want) will be 1-2 greens and 1 red! 

As shown, I love to pare this with a kale salad! The image on the top of the page is 1 green of kale salad, 1 green of cauliflower rice, 1 red of meatballs! Such an amazing and fulfilling dinner!

That's it! Enjoy!


There's just something about finding a recipe like this that is just delicious, and so chock full of veggies that you don't feel guilty at all when you eat it!

Paleo Phad Thai is like that.
Butternut Squash, Spring Greens Salad was like that.

I've found a lot of recipes like that lately!

This is one is a winner too! I got home one night from work and was SO hungry so I literally piled a plate SO high with this delicious mix and there really is NO feeling bad about that!

So many nutrients!

So many delicious whole foods!

What's not to LOVE?

Firstly,  I have to give credit where credit is due! This delicious recipe was originally found on the Roasted Root! I personally tweaked the recipe a little bit to simplify it, AND because I'm obsessed with sriracha I added that too to give it a little extra punch!

A lot of what I modified in this was just simplifying! You may disagree with this, but hear me out! I'm a grad student. You know this. I don't have the budget to have obscure ingredients like grapeseed oil, Portobello mushrooms (okay - not obscure, but more expensive $$), kosher salt, or cayenne pepper (see Portobello mushrooms haha)! Heck, even having fresh garlic is a bit of a stretch for me on occasion because it seems like an extravagance!

I lean heavily on spices in recipes because they LAST! They never go bad! I can get garlic or chili powder at the store and they'll last me for 6 months to a year! So that primarily how I modified this recipe.

What you'll need:

  • Medium spaghetti-squash
  • Olive oil, 2T
  • Garlic or garlic powder
  • Mushrooms (Portobello if possible) - 3 cups, chopped
  • 2 teaspoons of italian spices
  • Chicken - I used 3-5 chicken tenders
  • Kale - original recipe calls for 4 cups
    • I just cut up a bundle of kale without measuring
  • Zest of 1 lemon
  • Salt, 1/4 teaspoon or to taste
  • Sriracha
Directions:
  • Preheat oven to 375 degrees. Use a knife to put holes in spaghetti squash and bake for 40-60 minutes. Then set aside until you're ready to use it!
  • In a medium skillet, add the oil and heat to medium. 
  • Add the garlic or a few shakes of garlic powder, and the mushrooms. Saute for 5 minutes until the mushrooms just start to soften and brown.
  • Add the chicken tenders. Cook for 1-2 minutes and then add chopped kale leaves. Add the Italian seasoning to taste!
  • Continue cooking for about 5 minutes more. Kale leaves will start to wilt and chicken should cook through.
  • Add the lemon zest (and juice if you'd like!!), and salt! Stir and cook for a minute or so longer. Remove from heat.
  • Use a fork to remove spaghetti squash from shell and place them in a serving bowl.
  • Add the chicken, mushroom, kale mixture to the serving bowl and toss everything together.
  • Before eating, top with sriracha, and ENJOY!
Though I don't know the specific measurements - I do know that this is 21 day fix approved! I would guess 2-3 greens per serving, 1 red, and maybe 1 teaspoon for the oils and the sriracha! 

I hope you all like my version! Let me know what you think!


This one is my NEW favorite salad!

I wanted to make something super easy this week that helped me use up the butternut squash that I had bought and not used the week before. And I didn't want to have to cook much of anything!

So, this is one of those super easy go-to's that you should definitely keep on the back-burner in your recipe stash!

What I like about this recipe?

  • Primarily veggies, and let's face it - you can't go wrong with that! So many recipes I share or that I commonly eat have a huge starch component! What I love about this one is that you don't really HAVE to use the starch if you don't want to!
  • Super versatile - You can add what you do and do not want to this! If you don't like squash, substitute another veggie!
  • Minimal time and minimal cooking - I store bought or already had a lot of these staples. Yes, that adds to the cost, but it also adds to the ease of prep which us graduate students LOVE!
  • No dressing required - This is one of those salads that is so tastey in and of itself that you don't need dressing! And if you're on 21 day fix, that's a MUST because we only get one of those little orange containers!
  • GOAT CHEESE - I might be a little obsessed with goat cheese! But seriously the goat cheese in this recipe, MAKES IT! I promise you! It's incredible! Definitely don't leave it out!
Before, I get started, I have to give credit where credit is due! I originally modified this recipe from this Chili-Roasted Butternut Squash post on Kelly's Kitchen!

What you'll need:
  • 1 bag of frozen butternut squash OR one fresh butternut squash
    • I prefer the fresh variety because then your squash gets a nice texture to it!
  • Chili Powder
  • Cumin
  • Spring greens
  • Quinoa 
    • I pretty much always have pre-pared quinoa in my refrigerator! That way I can cook a big batch and then just add yellow 21 day fix containers of it to whatever I'm eating that day!
    • Optional: If you're not a fan of quinoa, you can use black beans!
  • Goat Cheese
  • Roast chicken - One of those prepared ones from the grocery store!
  • Extra Virgin Olive Oil (EVOO) for roasting the squash
Directions:
  • Finish roasting the chicken per package instructions.
  • Prepare quinoa, if not already prepared!
    • Use a 2:1 ratio of quinoa to water! Boil and then reduce heat to low, cooking until quinoa has absorbed all the water.
  • Prepare Butternut Squash
    • Preheat oven to 450 degrees!
    • If using frozen squash-no preparation needed!
    • If using fresh squash...Cut up the squash into cubes, discarding the seeds in the interior.
    • Toss prepared squash in 1 tbps EVOO, chili powder and cumin (to taste), and some kosher salt and pepper - I used about 3 tsp of both cumin and chili powder
    • Evenly distribute on a greased baking sheet
    • Bake for 20 minutes
  • Assembly
    • 1 green container of spring greens
    • Top with:
      • 1 green container of chili-roasted butternut squash
      • 1 yellow container of quinoa (or black beans if you went that route)
      • 1 red container of roasted chicken
      • 1 blue container of goat cheese
Voila!

That's it!

Super easy, delicious and 21 day fix approved! It's great for a quick-and-easy lunch as well as dinner!

21 Day Fix breakdown: 2 greens (for spring greens and butternut squash), 1 yellow (for quinoa/black beans), 1 blue (goat cheese), 1 tsp (for EVOO - or at least that's how I count the oils in this recipe because there's so little!)

ENJOY!


It's Foodie Friday! And I've got an awesome recipe for you today! But first, a little story...


I don't like cauliflower...

It's like one of those bad memories from when I was a kid.

Cooked, raw...I just don't like it. It's so BLAND!

Well, we had a challenge in one of my challenge groups about a month ago where we were supposed to find a recipe that we thought might make us want to try a food that we don't like again. And if we were really feeling bold, to try that recipe out!

Obviously, my food of "choice" was cauliflower.

Yuck.

Anyways, the recipe hunt began...

For me, I knew that I needed a recipe where the cauliflower was as disguised as possible...maybe where the cauliflower was "pretending" to be something else.

Well, fortunately I found a couple that fit the bill!

Cauliflower Rice Lettuce Cups with Sriracha Peanut Sauce from Veggie & the Beast Feast

Cauliflower Pizza Crust which I've found featured in many places, but here is the link to Give Up the Gym.

Well, I decided to tackle the Cauliflower lettuce wraps first...I've been on an Asian food kick lately, and for some reason lettuce wraps of any form remind me of P.F. Changs. Am I alone in this?

What you need:

  • Onion & Pepper frozen veggie mix - 2 packages
  • 4 ounces of shiitake mushrooms, chopped
  • 1 lime
  • Soy sauce, reduced sodium preferably
  • 1 head of cauliflower
  • Iceberg or Bibb lettuce
  • Cilantro and chopped peanuts, optional, for topping
  • Chicken tenders, cooked - optional
  • Sriracha Peanut Sauce
    • Natural peanut butter, 1/2 Cup
    • 1C almond or coconut milk (I personally think coconut is better)
    • 3 tablespoons honey
    • sea salt, 1/2 t
    • 1T Rice vinegar
    • Sriracha to taste...I added probably 1/2-2T

What to do:

  • Chop up the cauliflower head into smaller florets so that they'll fit nicely in the food processor. If you have a good food processor, this might not be a problem for you...but I kind of have a crappy small one and really had to use small cauliflower florets.
  • Process the cauliflower in the food processor until it achieves a nice, rice-like texture.
  • Sautee your veggies - for this adventure I used my favorite frozen pepper and onion mix and some fresh shiitake mushrooms
  • Once the veggies are cooked, drain off the excess liquid - that will save your filling from being soggy
  • Add in the cauliflower rice and saute until slightly golden.
    • Optional: Saute some chicken tenders to top your lettuce wraps with
  • While the veggies are cooking, combine the ingrdients for the sauce in a small saucepan and heat over medium. Sauce should start to boil, boil for about 3-5 mins, and then thicken
  • When everything is cooked, all that is left is for you to assemble as desired and then enjoy! :-)
 I personally really like to assemble mine by adding the veggie/cauliflower mixture on top of the lettuce, followed by a grilled chicken tender, then a drizzle of peanut sauce.


For 21 Day Fix: If you measure everything out right, this could count as 1-2 green containers, 1 red container, and two tablespoons for your nut butters! Be careful not to go over on peanut sauce! That's the biggest source of calories in this dish!

I hope you enjoy this one! It's a goodie!

Until next time,

I have recently been feeling like I really don't get enough protein in day-to-day. Especially with this new program I'm doing which involves a lot of weight lifting! If I really want to get shredded - I need to give my body what it needs, right?

Well since realizing that I have made a concerted effort to get more, good protein into my diet. And one of the best sources of natural protein comes from eggs. But the problem I kept running into is that eggs are also high in fat, especially if you're someone like me who really enjoys nut butters, hummus, etc. in their diet as a way to get their healthy fats. So what's a girl to do when you need the protein, but not the fat!

Egg whites, my friends. Egg whites!

Here are a couple very simple recipes that have very recently become staples in my diet as a source of high protein, and a little healthy fat!

EGG MUFFINS
I'd seen these on pinterest before, and it had been a while since I'd made them, particularly because of the aforementioned problem--great protein but too much fat for me to be having as a snack.

Well, this time I tried something a little different:

What you'll need:

  • Frozen veggie blend - I used a Pepper & Onion Frozen Veggie blend by Kroger
  • Raw mushrooms - however many you want!
  • Egg Whites - I used 32 ounces of Break free egg whites by Kroger
  • Eggs - 4
  • Monterrey Jack Cheese - 2.5 ounces

Making these was seriously so easy!

First - preheat your oven to 375 degrees.

I sauteed the veggies until they were softened - first starting with the frozen veggie blend, then adding the mushrooms until they were soft.

While those were cooking, I scrambled the 4 eggs and then mixed them together with the egg whites in a larger.

After the veggies were cooked, I mixed them into the egg mixture.

Then mix in the cheese. (If you'd prefer, you can reserve the cheese and instead top the muffins with cheese after they're cooked)

Start filling a muffin tin with the mixture--about 3/4 full should do it! Don't fill too full or they will massively bake over.

Bake at 375 for about 30 minutes! They should be a nice golden brown when they're finished cooking!

ENJOY!

**For quick grab-n-go snacks I threw two egg muffins into a ziploc bag and snagged them in the AM for convenient healthy snacks at lab!**

You'll probably notice pretty quickly that you have way more mixture then muffin tins available! If you want, you can just make multiple batches of muffins! OR if you're interested in some more variety, then keep on reading!!

EGG & VEGGIE BREAKFAST BURRITOS
I don't know about you, but I'm a FAN of breakfast burritos! But the ones you by at fast food joints or even at coffee shops are always so oily and loaded with fats. Ew. Pass.

So, I decided that since I had extra egg mixture, I'd whip up some breakfast burritos!

Now, no need to go get more ingredients! All you need to do is this...

Take your leftover egg mixture from above and pour into a pan.

Scramble the eggs.

When fully cooked, remove from heat!


Now for the assembly line!

First, lay down some aluminum foil.

Then, your tortilla.

Top with your egg mixture.

Then cheese (if you so choose).

Fold up your burrito -- side, ends, other side--and place seam side down on the aluminum foil.

Wrap up and repeat!

Refrigerate these goodies and enjoy! :-)


These goodies are rapidly becoming my new favorite AM snack! They're packed with good ingredients and hold me over until lunch and then some!

I highly suggest you try them out!

Eggs (especially egg whites) are your friend when you need more protein in your life!

Until next time!


When I was on Weight Watchers before I hated football Game Days. I mean, I didn't! They were a blast, but I hated the fact that I felt the need to deprive myself of EVERYTHING that I wanted to eat on Game Day.

Wings.
Pizza.
Tacos.
Beer.

I'm not going to lie--those things still taste reallllllll good. I still struggle to say no! So, instead of saying no--why not try a healthy alternative!

Here are some delicious football game day eats, just in time for the Super Bowl (Go SEAHAWKS!)! Not only are they delicious, but they're HEALTHY!

First up...

Healthy Cauliflower Barbecue Bites

I've only made these once at this point, but OMG I love these!!!! I LOVE wings! And these, though they're not as hearty as chicken, they definitely give you your wing FIX!

What do you need?
Prep the cauliflower....

  • 1 head of cauliflower
  • Garlic powder
  • Salt
  • Pepper
  • PAM original
  • Kroger Buffalo Wing Sauce
  • Sriracha Hot Sauce


Directions:
  1. Preheat the oven to 400 degree F
  2. Prep the cauliflower by cutting off the stems and prepping the florets.
  3. Coat the cauliflower florets with PAM cooking oil.  Then toss the cauliflower in garlic powder, salt and pepper to taste.
  4. Bake the cauliflower for 20 minutes.
  5. Make a sauce of about 2/3 buffalo wing sauce and 1/3 sriracha. **Add more sriracha if you prefer spicier**
  6. Up the oven to 450 degrees and bake for another 5 minutes.
  7. Serve with blue cheese or ranch (whichever you prefer) and celery if you'd like!

Then Enjoy! Yum!!

Cauliflower Buffalo Barbecue Bites - NOM! So good!

Tortilla Pizzas

This is one of MY FAVORITES! I have been eating this since I started Beachbody and it is one of my favorites! I LOVE me some pizza and beer, especially on game day! And I'll be damned if someone says I can't have that on game day! Soooooo I lightened it up! :-)

 The big thing with pizza is all the carbs, so I lighten it up the most by using tortillas instead of pizza dough for my crust! Then your toppings can be whatever you want! I like veggies and light proteins like ham, chicken, or turkey bacon. So the what you need list is very short and flexible!

What do you need?
  • Large flour tortillas
  • Whatever toppings you want!
    • Some combinations to try:
      • Olive oil, cherry tomatoes, spinach, mozzarella
      • Pesto, spinach, mozzarella
      • Cheddar cheese mix, ham and spinach
Directions:
  1. Preheat the oven to 425 degrees F
  2. Make your pizza how you like it!
  3. Bake for 10-15 minutes, or until crispy!

Then Enjoy! Seriously - my favorite thing ever!!! Totally cures my pizza fix!

Try some stuff out--olive oil, pesto, or tomato sauce is totally cool!
Veggies - tomatoes, spinach, artichokes, basil, etc.
Protein - chicken, turkey, ham, turkey bacon

Keep you toppings light just like your crust!

And if you want a beer with your pizza? Totally fine! I'm all about balance and substitutions, not about deprivation. So instead of a high calorie beer, try a light beer! I know, I know--light beer has a bad rep! But I loved Corona Light and that is still my Game Day, at home go-to!

This is a go to! So keep these toppings in your fridge even NOT on Game Day and you'll have a healthy, junk food-tasting fix!

Beer and pizza can 

Fish Tacos

I came across this recipe when I was doing T25 and I LOVE it! Fish tacos man!! You can't go wrong!! This is so so light and delicious! All good carbs, lean protein, and yummy veggies!

Cod Fish Tacos from the Focus T25 recipe book! So good!
What do you need?

  • Corn tortillas, small
  • Cod fillets
  • Cole slaw mix
  • Cilantro
  • Lime


Directions:
  1. Bake cod filets per package directions
  2. Take 3 corn tortillas and top with cod fillets
  3. Add cole slaw mix on top of cod fillets
  4. Add ripped up cilantro and squeeze lime atop fish tacos
That's it!! Easy!! Super simple and super delicious!


And that's it!

Healthy Game Day treats for you to try out at your Super Bowl party!! Annnnnnd Go SEAHAWKS!!


I love love LOVE crock pot recipes during the winter & fall! I mean--I love these recipes all year round, really but they're especially perfect for warming you up on colder days. And they're even better for us busy busy people because they're just SO easy.  You just toss a bunch of stuff in a pot and leave! What's better than that?

I actually really get irritated by and try to avoid any crockpot recipe that asks you to sautee something before you put it into the pot. It kind of defeats the purpose, don't you think?

Well, anyways, of all the crockpot recipes I've posted, I think the majority of them have been chili recipes! What can I say? I love chili! I promise I'll mix it up with the crock pot recipes eventually, but I have just been craving some chili lately since it's been a while since I've made it.

So today's recipe is a very simple, very delicious Veggie & Chicken Crockpot Chili!  A very hearty, healthy meal with very basic staple ingredients that are cheap and make preparation a breeze!


Something I LOVE about chili in terms of a hearty dinner is that it's so simple and so few ingredients to prepare. You just need some protein, beans, tomatoes, and veggies! You can pretty much tweak it whatever way you want! 

This way has become my favorite--chicken broth base with lots of tomatoes, veggies, and beans and some protein. I add tons of seasonings as you'll see! Especially lots of chili pepper...

First let's start with what you'll need!

Grocery List:
  • Kroger Low Sodium Chicken Broth - $1.55
  • Kroger Canned Black Beans - $0.49
  • Kroger Canned Kidney Beans - $0.49
  • Kroger Canned Fire Roasted Tomatoes - $0.79
  • Hunts Tomato Paste - $0.89
  • Frozen Veggie Mix (Soup Mix--contained some potatoes, carrots, beans, peppers, onions, etc.) - $1
  • Chicken Breasts - $10.00 for a 2lb package
  • Shredded Mexican Cheddar Cheese - $2.99
Total = $18.20

Other items you will need (that I already had...):

  • Garlic Powder
  • Onion Powder
  • Chili Powder
  • Cumin
  • Black Papper
  • Salt
Cut up 2 large chicken breasts (about 1lb of chicken) into 1" pieces. I didn't use all of the chicken breasts in the package I bought. I used the rest in an another recipe.

Combine your cut up chicken breasts in the crockpot with 1.5 cups of chicken broth, the two cans of beans, roasted tomatoes, tomato paste, and the bag of frozen veggies (about 2 C of mixed veggies I would say). 

Then add all your seasonings! I don't really measure these. I pretty much judge by the flavors I like, and add things in "shakes."  But I'll do my best to estimate what I added here.
  • 2 teaspoons of garlic powder
  • 2 teaspoons of onion powder
  • 2-3 Tablespoons of chili powder**
  • 1/2-1 teaspoon of cumin**
  • Salt and pepper to taste
**I usually add more of both of these because I REALLY like the smoky, spicy flavors in my chili!

Then mix everything together.

Leave on low for 6-8 hours. I usually let them go closer to 8 hours because a) that works out better for timing with when I like to eat dinner, and b) all the flavors really melt together that way!

Top with a sprinkle of cheddar cheese and enjoy!

This is a super simple MOTW, but it's hearty, healthy, and so delicious! And who doesn't like coming back from a day out running around doing errands to something as delicious smelling as this?

For my 21 day fix friends: I can't really give you specific measurements because it kind of depends upon what you put in your chili! But my chili came out to about 1 red, 1 yellow, 1.5-2 greens, and 1 blue per serving! I'm not sure how to count the chicken broth, but if you are concerned about that, you could substitute the chicken broth for water and olive oil. Then, the chicken broth would count as 1 orange!

Happy crock-potting!


I love Thanksgiving! It's such a fun time to spend with great people--people you love! I WISH that I could've spent mine with my family, but unfortunately home is too far with too short of a holiday break to travel back.  

So, instead for the last couple of years, I have spent Thanksgiving with my local "adopted" family at what we've come to call Orphan Thanksgiving. Everyone who does not have a place to go or doesn't have family close by comes and joins us for a Thanksgiving feast.

Last year I made my Grandma Jane's twice baked potatoes. They're truly one of, if not my most, favorite foods.  They're delicious--but also quite butter heavy. And russet potatoes in and of themselves don't have the highest of nutritional content. So, instead, this year I decided to stick with my twice baked potato theme and instead make twice-baked sweet potatoes.

This recipe was one that my mom sent me from Sunset magazine! She knows I LOVE me some sweet potatoes, and she knows even more so that I love me some twice baked potatoes! Nom nom nom! Soooo delicious!

So, this year for Thanksgiving, I made...

Twice Baked Sweet Potatoes with Goat Cheese & Bacon

These were actually super simple to make--I hesitate to say easy, because twice-baked potatoes are labor intensive and time-consuming. I won't shy away from that statement. You do have to bake the potatoes twice, stuff them, etc. And depending upon how many you're making, they can take a few hours!

I was making 20, but I came to the realization that that didn't mean I needed to double every timing aspect of the recipe.  But regardless, I'll share with you what I did for my 20 person sweet potato feast--with a few modifications.

What you'll need:
  • 10 sweet potatoes (of varying sizes)
  • 1 lb of bacon - I used maple glazed
  • 10 oz of goat cheese
  • Olive oil - extra virgin
  • milk (I used an almond/coconut blend)
  • 3 tablespoons maple syrup
  • chopped chives
  • kosher salt and pepper to taste


 First things first, preheat your oven to 350 degrees.


While it heats up, prepare the potatoes.  Prick the potatoes multiple times with a fork, and slather with olive oil so that it coats the potato skin.

Once the oven has heated, baked the potatoes for 1 hour to 75 minutes. (I did 90 minutes and this was too much).  Your potatoes should be cooked and tender, but not mooshy.  I know...it's a "technical" term haha.

While the potatoes are baking, sautee the bacon.  I cut my pound of bacon into 1 inch pieces and cooked until well-done. Once cooked, drain on a paper towel to remove the majority of the grease. Pat dry once drained.  Once dry, roughly chop the bacon, and then set aside half of the bacon for filling and half for later.

Once the potatoes have been cooked, please please PLEASE allow them to cool for at least 15 minutes before trying to scoop out the insides. Be sure to leave the oven ON.


 Once cooled, scoop out the insides of the potatoes. If you're new to twice-baked potatoes, make sure that you leave a little bit of potato on the interior of the potato skin. That will ensure that your potatoes maintain structure once filled with filling.  


Once the filling has been scooped out, crush the potato removed from skins with a fork. Then mix in half of the roughly chopped bacon.  Crumble half of the goat cheese into the potato + bacon mixture, and then mix in. As the goat cheese melt, you'll find your mixture gets VERY creamy.  

Fill the potato shells with the entire mixture, evenly dispersing it between the potatoes. 

Chill these filled potatoes before attending your party (assuming the party is not at your house...).

Prior to enjoying, bake for 20-30 more minutes.  Then top with crumbled goat cheese, remaining bacon, and chives!

I make no promise that these are "healthy," but they're a a healthier option! And it's always fun to try to find healthier options of your holiday favorites!

To make this completely 21 day fix approved--switch out regular bacon for turkey bacon! And/or decrease the amount of cheese! :-) And stick with smaller sweet potatoes!

ENJOY! And try to stay healthy this holiday season my friends!


I'm sorry! I know I've been MIA, particularly with my recipes lately! I'm going to focus a lot on remedying that! In fact, I have a new idea to give MOTW a face-lift!

Money is something that I know is a point of distress for a lot of graduate students, am I right? So, when I find a really great recipe or combination of recipes for the week that fall on or below my $50 a week shopping budget, you'll be the first to know!

So, this week I'm kicking off my budget MOTW with two great recipes!!

Now before I get to the recipes, I want to tell you about my shopping process. I have some go-to meals and snacks. In fact, the only thing that I really switch up during the week is my dinners!

Breakfast: Shakeology
AM Snack: Fruit (usually banana or an apple), sometimes I have greek yogurt too
Lunch: Kale salad with protein (hard boiled egg or chicken)
PM Snack: Veggies (Celery or Cucumbers) + Hummus
Dinner: Varies
**Optional after dinner snack: Greek yogurt**

So before I go to the store, I take stock of what I have.

For breakfast, do I have almond milk and coffee and tea to mix with my Shakeology?
For my snacks, do I have fruit? Do I have veggies and hummus?
For lunch, do I have my kale? Do I some sort of protein to mix in? Do I have oil and balsamic vinegar for my dress?
And for dinner, I pick out my recipes and build my grocery list around what I don't have for that recipe.

Then, it's off to the store!  Today, what I got at the grocery store was this!
  • Kale (2 bunches)
  • Celery (1 bunch)
  • Hummus (1 container Kroger private selections)
  • 1 lb lean ground turkey (93% lean)
  • Frozen mixed veggies (for both recipes) - 3 different kinds (peppers and onions; vegetable soup mix; mirepoix mix)
  • 28 oz crushed tomatoes, canned
  • 2 more zucchini (i already had one)
  • 15 oz fat free cottage cheese (slightly cheaper than ricotta)
  • 24 oz of skim mozzarella cheese
  • 1 lb of salmon chunks with skin (cheaper than salmon filets)
  • Curry powder (recipe called for green curry paste, but I couldn't find it in the grocery store)
  • 1 gallon of Silk coconut milk
  • 1 box of minute brown rice
After all was said and done (and rung up) - my groceries totaled $38.06 after Kroger Club savings! That's less than $40 for a weeks worth of groceries!  

Now to the recipes!

Firstly, a recipe from my good friend Rachel's new cookbook, 30 Quick, Easy Meals which can be found on Amazon in both a hard copy and a kindle edition pdf! It's a GREAT cookbook, especially for people who are on a budget AND are short on time!  So, today, from that cookbook I will be cooking Curried Salmon over Rice!

What you need:

  • Salmon
  • Frozen veggies
  • Curry powder (or curry paste if you can find it)
  • At least 14 oz of coconut milk
  • Brown rice

Basically, these recipe was so delicious and so easy to make! I was surprised! I've never made curry anything before. In fact, I've never even eaten curry before. But everything in this just sounded so great.  Basically, here's the gist...

  1.  The recipe called for a salmon fillet, but as I mentioned above, buying the salmon chunks was cheaper! I sauteed these skin-side down for about a minute. They should still be pretty raw.  
  2. Take the skin off of the salmon pieces and break them into bite-sized chunks
  3. Mix your salmon and frozen veggies (I used mainly the the peppers & onions and the mirepoix mix) with curry powder.  
  4. Add coconut milk and let simmer until the sauce thickens. 
  5. Cook the rice while curry is simmering.  
  6. When it's the thickness you want, you're done! Ladle some curry mix over your rice and you're good to go!
This recipe was delicious! And it's just a teaser of all the delicious, quick recipes that are found in Rachel's cookbook! I HIGHLY suggest you check it out here!

Secondly, we've got a recipe that has become a favorite in my challenge groups--
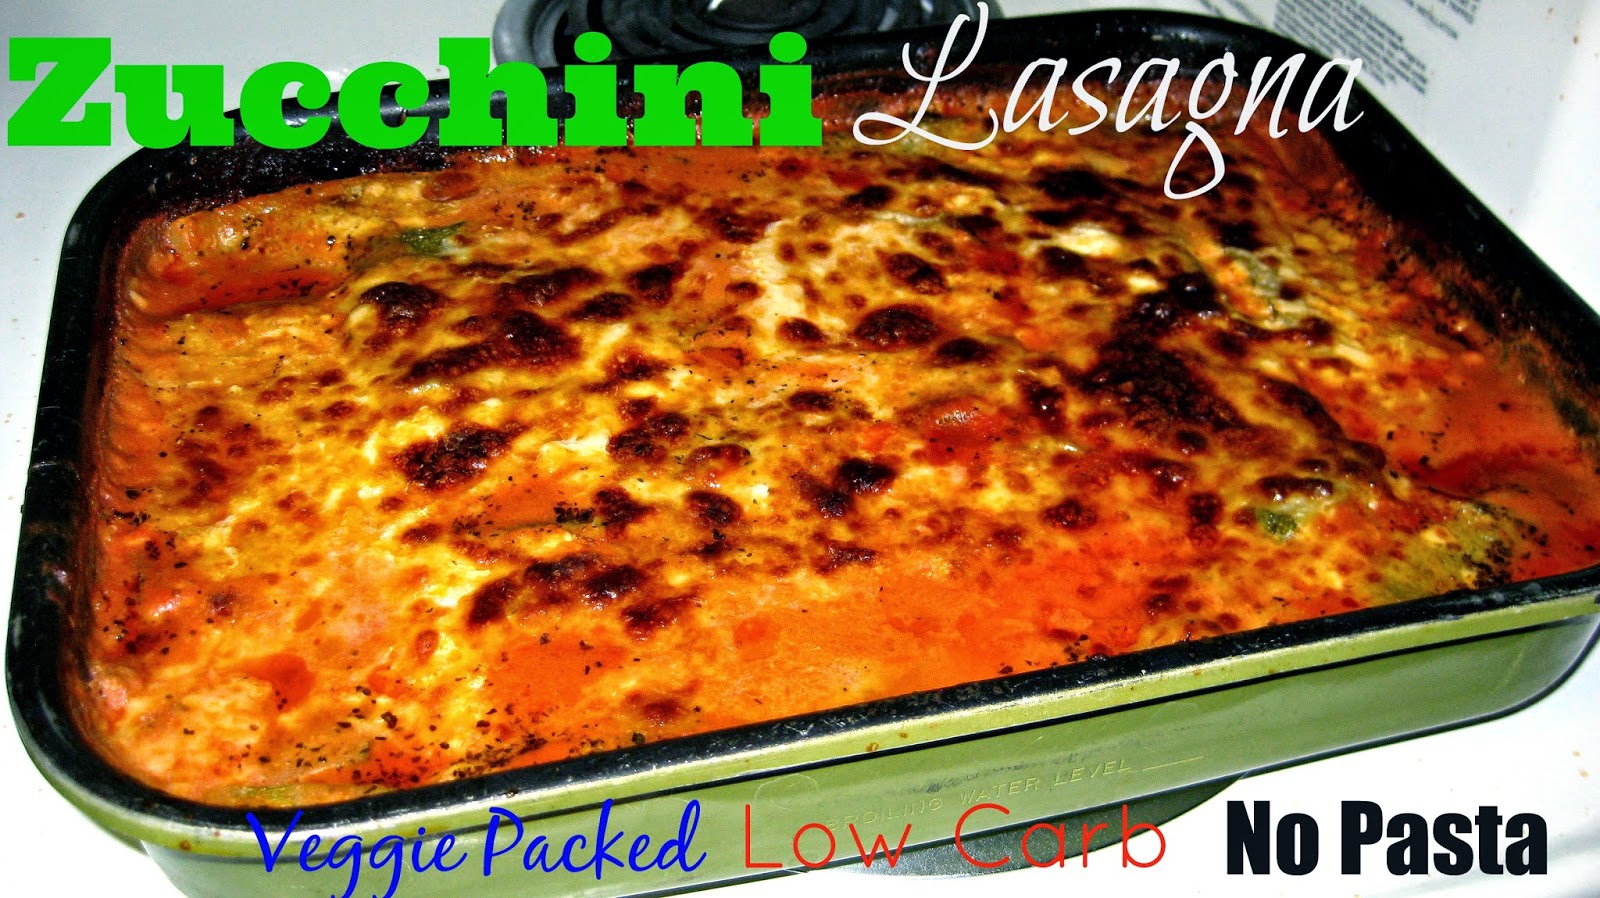
ZUCCHINI LASAGNA! For my fellow Italian peeps, this is a GREAT way for you to get your pasta fix without all the carbs associated with pasta dishes!  This is a recipe that I adapted from Skinny Taste's Zucchini Lasagna Recipe.

Now, fair-warning, this recipe is a bit labor intensive. But, I'm telling you, the taste is SO worth it!

What you need:

  • Ground turkey
  • Frozen veggies (or fresh) *optional for meat sauce*
  • Herbs and seasonings for sauce *optional*
  • Crushed tomatoes (28 oz)
  • 3-4 Zucchini
  • Salt (for zucchini preparation)
  • 15 oz cottage cheese or ricotta 
  • Parmesan cheese
  • Mozzarella cheese (for sprinkling between layers and on top)
Firstly, I tackled the sauce! This is a great thing to start with because it's going to simmer while you prep the other components.  

Basically, the great thing about meat sauces is that you can put whatever you want in it!  Meat sauces are super flexible like that! You want beef? Great. Peppers? Great. Hate peppers and want tons of garlic and onions? Awesome. Corn? That's great too!

Start by sauteing the ground turkey until there's no more pink. I ladled out the majority of the fat, but left a little bit in there for sauteing the rest of the veggies.

Then mix in your frozen veggies. Whichever ones you'd like! I stuck with the pepper & onion mix, as well as the mirepoix mix that I used in the last recipe.  I then added the crushed tomatoes, basil and italian seasoning to taste, as well as a bit of sugar to bring out the natural sweetness of the tomatoes. Let simmer for at least 20 minutes so all the flavors meld together. 

Now onto the zucchini...

Prepping the zucchini is by far the most labor intensive part of this process. You're probably think, why the heck would that be? Don't you just need to slice into strips and go?

Well, actually, no. Zucchini are very watery veggies. And, what we need to do is dry them out as much as possible or else you're lasagna is going to be more like soup than lasagna.   

So, after you've sliced everything into strips (and they don't have to be perfect...as you can tell mine aren't)...salt them! Salt will help bring out the juices, which you can then dab off.  Salt them and let them sit for at least 10 minutes.  Blot off any excess water.

Then, grill them, again blotting off the excess water after they've been grilled.

While you're zucchini are grilling - make your cottage cheese mixture by combining the 15oz of  cottage cheese with your parmesan cheese.  Set aside for assembly...

Now, you can assemble your lasagna!  During this time, I also preheated my oven to 375F.

Basically, this part is super easy! Kind of messy, but definitely easy! 

Start with your meat sauce on the bottom of the pan.
Layer zucchini on top of that.
Then your cottage cheese mixture.
Sprinkle with some of your mozzarella cheese.
Then layer some more zucchini.

Repeat this process until you run out of ingredients, and then top with mozzarella cheese!

I don't really think that pan size matters for the lasagna. Basically, if you want really thick lasagna, use a smaller pan. And a larger pan if you want your lasagna to have less layers.

After you've assembled your lasagna...bake covered for 45 minutes. Do not forget to cover! I totally did at first and it will save you some mess if you remember to cover your lasagna now!

After the 45 minutes have elapsed, uncover your lasagna and continue baking for 10-15 minutes or until golden brown on top.  

After baking, if you have the patience to wait and not dig in immediately, let your lasagna rest for 10 minutes. It will hold its shape better when you cut into it.  


While I was waiting for my lasagna too cook, I tackled some other miscellaneous meal prepping tasks.  This is a great time for that!

So, what did I do?

Ripped up kale for my kale salads
Chopped celery for my afternoon veggies and hummus
Hard boiled eggs for my lunch salad protein
Cooked and diced up a chicken breast for salad protein.

All my meals are essentially ready to be eaten! All I have to do is some assembly!  Super easy!

And now, I'm done for the day!  I'm sitting on my couch watching Harry Potter...haha.

Happy Meal Prep Sunday!


 Today I want to emphasize the The Importance of Meal Prep! If you want to maintain and promote your own healthy lifestyle, you MUST prepare yourself in every way possible!

My Beachbody coach loves to say all the time....

FAIL TO PREPARE AND YOU PREPARE TO FAIL!

Of course, this is super applicable to life, but my favorite way to apply that statement is to your nutrition! So today, I want to focus on meal prep! Last Sunday and again this weekend, I will be doing some serious meal prep, because it's just the ONLY way to really guarantee myself success in my nutrition by making all my snacks, meals, etc. accessible, easy, and a of course healthy! This is especially true when I'm doing 21 day fix! If you're going to be successful on this program - you NEED TO PLAN AHEAD!!!

So here's an idea of what my meal prep looks like!

Saturday - Recipe selection and grocery shopping. I will usually go on pinterest or online and hunt for recipes, OR I will go to my already absurd amount of collected recipes and choose from some of my favorites, like Paleo Phad Thai and these other 21 Day Fix Approved options.
Sunday - MEAL PREP DAY! Last weekend was a great example! Instead of vegging out all day watching football, which is how I wanted to spend my Sunday, I multi-tasked! I put football on in the background and got all my meal prepping and house work done in the meantime!

But now you might be asking - okay I understand planning ahead but what exactly do you do to prepare yourself?

Basically - I prepare absolutely everything I can ahead of time! So, first things first, I CHOP EVERYTHING UP!!!!

One of the ways I get my greens in during 21 day fix is by eating cucumbers (which I LOVE) and celery with hummus as snacks!  So, to make it as easy as possible for me to do this (which after all is the point of meal-prepping), I chop and bag EVERYTHING ahead of time!  I cut cucumbers up and celery up into small pieces and measure them out using the 21 day fix green container. Once I fill the green container, I dumb those pre-cut, pre-portioned cucumbers or celery into a ziploc bag and continue until I have cut up all the celery and cucumbers! What I'm left with is a tupperware full of pre-portioned, ready snacks that I can just GRAB in the morning to take with me to work.

This same strategy is used in my preparation of my fruit and greens! For example here, I had a cantaloupe that I wanted to use for my 21 day fix purples! So I chopped it up and kept it ready in a tupperware for the week! I could have pre-portioned these out just like I did for the cucumbers/celery but I ran out of ziploc bags! So, I just left these in the larger tupperware and filled a purple 21 day fix container before I left to go to work in the morning.

For my greens, I love to have a salad for lunch! I get creative with my salads! Kale with sweet potato and hard boiled egg/chicken with a lemon olive oil dressing, kale with grapes and almonds and lemon olive oil vinaigrette or balsamic vinegar or lemon! Yum! But the biggest reason I can do that is there's no need for me to rip up greens in the morning because I've already done that on Sunday! I rip up and throw all of my kale into a very larger tupperware container! I then throw a larger handful into a tupperware for lunch that day and top it with whatever ingredients I'm feeling for that days salads!

I also prepare all my protein ahead of time! I hard boil all my eggs (as shown below) and cook all my protein! This week it was chicken! I cooked about a pound and a half of chicken breast tenders (which I love because about 2 of them are equivalent to one 21 day fix red container), which I seasoned with whatever seasoning I was feeling that day! Coffee BBQ seasoning, cajun, italian seasonings, etc. It kind of depends on what I'm going to put the chicken in that week! This week was taco salads and taco bowls, so I seasoning them with a chili powder, Mexican blend!  That way your protein is ready to just throw into your meal or eat as a snack, with NO PREP NEEDED!!!

Also not pictured - I prepped and baked sweet potatoes as one of my starches for the week and also soaked and cooked a bunch of beans as my other starch, both of which I threw onto salads or into taco bowls during the week!

And that's it! It was a tedious task, but you know what? If you take a couple hours on a Sunday morning/afternoon while you're watching football or doing house chores, etc. you will save yourself SO MUCH TIME during the week and make eating health SO MUCH EASIER!!

I highly recommend meal prepping and I hope that some of these tips helped you with your own meal prepping adventures!!!

Until next time, stay healthy my busy friends! ;-)


How often do you CRAVE delicious, creamy ice cream but pass it up because of the calories??? Well, how about a delicious, healthy treat that is as easy as peeling a banana? (Seriously wishing I could insert some adorable little smiley/winky face here).


This Banana Peanut Butter Sundae is perfectly healthy, made with all natural ingredients!

And, as I mentioned, the recipe is as easy, as well--peeling a banana!

What you'll need:
-1 banana (frozen)
-Milk -- I prefer Almond Milk or a Coconut/Almond Milk Blend (only a couple pours)
-Peanut Butter (I used natural peanut butter)
-A blender

Recipe:
-Blend 1 frozen banana , 2 tablespoons peanut butter, and a couple pours of milk to thin out the mixture enough to blend!

DELICIOUS!!!

I hope you like it!

Oh and side note, it's 21 day fix approved, counting for 2 purples and a tablespoon! :-)

Until next time,


I've been dying to write this review since the day I got 21 day fix! Now, two rounds later, and I'm happy to say that I'm beyond satisfied with this program and how it turned out!

I'm not saying that everything went perfectly and that it was all sunshine and roses, but the results speak for themself!

7 pounds...1" off my waist...1" off my hips. Arm and ab definition like I've never had before!

But, this is a review, so I will tell you what I LOVED, where I struggled, and even what I didn't like! So, here it goes!

Struggles:
Those damn yellow containers....
I really don't  know what else to say. I'm Italian. I like my pasta...and pizza...and garlic bread. And beer. Ya...the yellow containers are really hard for me! I sort of half-assed the food part of the program for the first time through, and didn't really lose a lot of weight. But, pre-challenge group, I really decided that I would fully commit to this the second time around, including the food and that made all the difference in the results. But ya, the yellow ones are definitely the hardest for me.

Also, another struggle for me was getting more creative with my veggies!  I'm very much a salad girl.  That's my favorite way to eat veggies, for sure, but what with only being allowed 1 orange per day, I struggled with how to get my veggies in, because, let's face it, I'm not about to eat a dressing-less salad! So, I had to come up with new strategies for getting my veggies in, since I had to get 3 greens in during the day!  My favorite trick became throwing a hefty handful of chopped spinach into my shakeology for breakfast in the trust me, you can't even taste the spinach once you're done!  Check out my post about green smoothies for tips and recipes ideas!  Then, I would tend to have a big kale salad for lunch. And for my last veggie, I would either have a snack of veggies and hummus (I liked cucumbers, celery or tomatoes), OR I would save up that last veggie for dinner and sautee some veggies into a veggie stir-fry or my favorite Paleo Phad Thai or get another serving of veggies at dinner in one of my many chili recipes!
morning--

Dislikes:
These are actually very few and far between for me because I was so happy with the eating portion of this program, and the workouts definitely delivered on their promises to get me strong and toned! You definitely feel the burn!  The only thing that I maybe didn't like was the fact that there was a workout everyday for 3 weeks, but I think maybe that's part of the deal when you buy a program designed to deliver big results in 3 weeks!
The recipes are my only other complaint. The food book tells you what to eat and gives you some recipes, but I really never used them. I relied a lot on pinterest, the internet, my challenge group girls, and my coach to give me good recipe ideas.

LOVES:
-Those adorbs little containers!! Need I say more? I'm done with 21 day fix now and I still  use them all the time!
- The modifications in literally every workout! You'll probably need them! I definitely did! The side plank in, I think, Dirty 30 I had to modify up until the very last day I did that workout! Yay for progress!
-The workouts. Seriously. Ass kicking at it's finest! Especially cardio fix! That one is a killer! But don't worry, it's a good kind of ass-kicking!
-Autumn. Seriously, I'm a fan of Autumn. I have always been a big Jillian Michaels fan, and you definitely need the tough love like Jillian gives when you're making a big lifestyle change. But what I liked about Autumn is that she's like a more positive version of Jillian Michaels!  She cracks a couple jokes here and there with her workout buds in the videos and really draws you into the fun too! Plus, I love how much much she pushes them! It motivates me too!
-The Challenge group! Seriously, I wouldn't have had the successes I did without my group! That was my first challenge group, and I'd never thought I'd needed one because I always feel like if you're going to make a lifestyle change, you can't really on other people. You need to motivate yourself.  And I still believe that! But, you're going to have off days. You're going to have moments when you don't understand why you're putting yourself through it! And that's when having a team and a coach that are relying on you to commit with them is a GREAT thing!  When you get in moods like that, you remember that you have these people behind you that want you to succeed too, and they want to be motivated by you, and you eventually want to motivate them too!  That's the benefit a challenge group gives you and it is seriously invaluable!  


So, that's my 21 Day Fix review! If you're looking for a program that's simple, straight-forward, pushes you hard and tests your dedication, but delivers on it's promises in 21 days, then you should definitely try this program out!

Note: I was drinking Shakeology while on this program! Shakeology is meant to enhance your results by providing your body with the nutrition it needs to refuel and replenish after a tough workout!  If you want to know more, check out my post about Shakeology here!

Message me on Facebook or comment here if you want more information or if you want to try the program!


I'm very excited to announce that my blog has moved!

You will be automatically redirected to the new address.

If that does not occur, please visit https://thefitnerd.squarespace.com/'.